Home Blog Page 87

3D Printer G-CODES – The newbie guide!

9

What are the 3D Printer G CODES and why they are important ? Check this guide to learn the most useful commands, and also how to use it!
Please, keep in mind that this tutorial designed for Marlin / Repetier firmwares, it is not guaranteed to work with another firmware,3DPrinter g-code

What is a 3D Printer G-code?

G-code (a.k.a RS-274), which has many variants, is the common name for the most widely used numerical control (NC) programming language. It is used mainly in computer-aided manufacturing to control automated machine tools (like CNC’s and 3D printers). G-code is sometimes called G programming language

How to send  3D Printer g-codes to the printer?

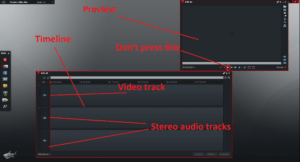
In repetier host, you should first connect the printer, then go to Manual control and write the code on this box:
img1
then just press SEND.

In Simplify3D, you need to open the tools > Machine control Panel. in the control panel, choose Communication
gcode 2

Remember!, the letters should be in in CAPITAL, example: G1 X-1 Works | g1 x-1 may not work

What can a G-CODE do for me?

Using G-Code, you can set up scripts on your 3D printer, for example:

I want that my printer, before it start printing,

my bed to 110ºC
– heat my nozzle to 180ºC
– go home
– do auto-leveling
– heat the nozzle up to 230ºC
– move nozzle to the left corner, off the bed
– extrude 10mm of plastic (to clean the nozzle)
– start printing

How we do this? using some G-codes!!!

M140 S110 // this will heat the bed to 110 degrees
M104 S180 T0 // this will heat the nozzle to 180 degrees
G28 // Go home! (if you don’t define X, Y or Z, it will go home to all of them)
G29 // do the auto-leveling feature
G28 X // it will go home on the X axis again
G91 // This is needed to move the extruder!
G1 E10 F240 // This will extrude 10mm of plastic
G90 // This is needed to move the extruder!

Wow!, too much strange commands right? well, they are worthy to know!, and this is what i’m gonna show you!

On simplify 3D you can set those scripts here:
3D Printer G-CODES

On repetier you can set those scripts here:
gcodes


MOST USEFUL 3D PRINTER G-CODES
(and how to use them)

G0 and G1: Move

G0 = Rapid linear Move (this means it will go FASTER)
G1 = Linear Move (normal speed)

How to use?
G0 Xnnn Ynnn Znnn Ennn Fnnn Snnn
G1 Xnnn Ynnn Znnn Ennn Fnnn Snnn

What the hell is this italo?
Well, most of the commands accept multiple moves at time, this means that if you send this:
G1 X100 Y100 Z100 E10
The nozzle will move 100mm on X, 100mm on Y, 100mm on Z, while extruding 10mm of plastic.

But you can also move only one at time!, example:
G1 X10 = X axis will move 10mm

G2 & G3: Controlled Arc Move

G2 Xnnn Ynnn Innn Jnnn Ennn Fnnn (Clockwise Arc)
G3 Xnnn Ynnn Innn Jnnn Ennn Fnnn (Counter-Clockwise Arc)
Parameters
Xnnn The position to move to on the X axis
Ynnn The position to move to on the Y axis
Innn The point in X space from the current X position to maintain a constant distance from
Jnnn The point in Y space from the current Y position to maintain a constant distance from
Ennn The amount to extrude between the starting point and ending point
Fnnn The feedrate per minute of the move between the starting point and ending point (if supplied)
Examples
G2 X90.6 Y13.8 I5 J10 E22.4 (Move in a Clockwise arc from the current point to point (X=90.6,Y=13.8), with a center point at (X=current_X+5, Y=current_Y+10), extruding 22.4mm of material between starting and stopping)
G3 X90.6 Y13.8 I5 J10 E22.4 (Move in a Counter-Clockwise arc from the current point to point (X=90.6,Y=13.8), with a center point at (X=current_X+5, Y=current_Y+10), extruding 22.4mm of material between starting and stopping)
Why use it?

Why use 3D Printer G-CODESNotes

1In Marlin Firmware not implemented for DELTA and SCARA printers.

G4 Dwell (a.k.a delay or pause)

G4 Pnnn
Pnnn Time to wait, in milliseconds

Example
G4 P200
In this case sit still doing nothing for 200 milliseconds. During delays the state of the machine (for example the temperatures of its extruders) will still be preserved and controlled.

G10 and G11 – Retract and Unretract

If you send G10 (the hotend must be hot, otherwise it wont do nothing) will retract the filament. and when you send G11, it will unretract, this can be useful to stop oozing. but there are more effectives methods as proper calibration or cleaning scripts.  the distance can be set on the firmware or via software if you have EEPROM enabled

G28: Move to Origin (Home)

This command can be used without any additional parameters.
X Flag to go back to the X axis origin
Y Flag to go back to the Y axis origin
Z Flag to go back to the Z axis origin
Examples
G28 (Go to origin on all axes)
G28 X Z (Go to origin only on the X and Z axis)

G29: Detailed Z-Probe – (a.k.a auto leveling)

Example: G29
Probes the bed at 3 or more points. The printer must be homed with G28 before G29.

Please notice that for using this, you need to have a configured and working system!, check more in my another tutorial here: Click here to open the AutoLeveling tutorial

G90 and G91: Set to Absolute/Relative Positioning

Example: G90
All coordinates from now on are absolute relative to the origin of the machine. (This is the default.)

Example: G91
All coordinates from now on are relative to the last position.

G92: Set Position

This command can be used without any additional parameters.
Xnnn new X axis position
Ynnn new Y axis position
Znnn new Z axis position
Ennn new extruder position

Example

G92 X10 E90
Allows programming of absolute zero point, by resetting the current position to the values specified. This would set the machine’s X coordinate to 10, and the extrude coordinate to 90. No physical motion will occur.
A G92 without coordinates will reset all axes to zero.

Note that this can be dangerous!, if you are on X200, and your X-Max is 210mm, the printer will think that the hotend is at 0, and will let it to move more 200mm (200+200 = bad idea, and probably a lot of noise).

M92: Set axis_steps_per_unit
Xnnn Steps per unit for the X drive
Ynnn Steps per unit for the Y drive
Znnn Steps per unit for the Z drive
Ennn Steps per unit for the extruder drive(s)
Examples
M92 X87.489 Y87.489 Z87.489
M92 E420:420

Please note that you NEED to have eeprom enabled to save these values! (save sending M500)

M104: Set Extruder Temperature

Example
M104 S190
Snnn = Target temperature

M140: Set Bed Temperature (Fast)
Example
M140 S55
Snnn Target temperature
Set the temperature of the build bed to 55oC and return control to the host immediately (i.e. before that temperature has been reached by the bed). There is an optional R field that sets the bed standby temperature: M140 S65 R40. (it will wait until the temperature is 40ºc before it do anything).
NOTE: is better to use M116 commands!

M116: Wait for temperatures stabilize
M116
Wait for all temperatures and other slowly-changing variables to arrive at their set values if no parameters are specified. See also M109.

M112: Emergency Stop
Any moves in progress are immediately terminated, then RepRap shuts down. All motors and heaters are turned off. It can be started again by pressing the reset button on the master microcontroller.
You just need to send M112!
But be aware!, if you have a hardware problem is better to remove the printer from the power!


You can see a lot more G-code commands on the following PDF.

[CMDM-download id=1120]

My life on a 3D printing Startup

0
Ingenia3D
Ingenia3D

My life on a 3D printing startup

I never thought when finishing my school. I would been working on my passion a 3d printing startup founded by me and a couple friends

There were many years of study, sacrifice and struggle to achieve my degree. Finally I got it and I graduated as a computer engineer with an honorific metion.

Then with some friend who share my passion for 3D printing technology, we decided to embark on the world of Startups and we founded “Ingenia3D” a 3d printing startup. But I’m not going to speak a lot of my startup, perhaps I leave it for another post.

Ingenia3D - 3d printing startup
Ingenia3D a 3d printing startup

Now, I’m going to tell you my experience since I decide to choose this path…

Let´s face it, many people has this fever for making business or at least it is in my country.

 But, Why? Where it comes such a need to found a company?

People constantly sees first the end of the road thinking, if I open a business I will have billions of dollars, a lot of children now have a lot of money, I have twice experience  I can make it!

We got carried away by the environment but, in the battle we are afraid. Let me tell you this: if you choose the path of being an entrepreneur, you will suffer as never in your life.

  • Sleepless hours.
  • Hours of planning things.
  • Contracts will fall.
  • Annoying people.
  • Eating very little.
  • Invest a lot.

Don´t misunderstand me, if you survive all that, believe me the effort will worth it. It will not come alone, you need to always execute viable projects that can generate revenues, turn your passion in to something that you can live.

I know, is hard I’m not going to lie you. You will feel constantly the necessity of leaving the boat, try to find a job, live like a normal person. I call this point “the grim reaper” When you lose the way and your propose is when all your projects are destined to fail.

I´m going to tell you a phrase that  one person told me long time ago, an incredible person named Miguel Nieva  country manager of one of the  Startups I most admire here in Mexico.

Ingenia3D - 3d printing startup
Ingenia3D 3d printing startup

 People will crash, but don’t make the projects do.

A person will always get up again, you always are going to give more, no matter the beating of life in front of us we can always return to stand and continue projects once the project dies emotion there is no turning back.

On Ingenia3D we are a small Startup, we are no more than 4 people working hard to educate our city, so they know all the advantages of 3D printing, we constantly training us, searching for new opportunities and new markets that we can dominate.

We know that there’s a lot of competence, in our city we are the only Startup of 3D printing but the people always choose the traditional media, people are scared of technology. That’s why our principal mission is education. We want all the people look the potential that can be achieved with this technology and we want to help them.

Our motto is design it and together we can make it possible, a mantra that I repeat myself every day to continue working.  I believe in our projects, in our Startup and I know that patiently our effort will succeed.

Ingenia3D
Ingenia3D


Tell me what projects are you working for?

Perhaps we could collaborate!

Are you working on a Startup and you are afraid?

Contact me and let me help you!

3D Printing Filament Review

2
Carbon Fiber filament from Colorfabb

In a previous blog I discussed what makes good 3D printing filament. That blog was written from the hard earned experience I got in working with the filaments I’ll review here.

Testing procedures

All of this filament review were 3D printed on a Makerbot 5th gen Replicator or Lulzbot Taz 5. The 5th gen 3D printed in 1.75 mm, while the Taz 5 3D printed with 1.75 mm and 2.85 mm filament. All were printed to temperature recommendations from the factory. I’ve 3D printed (or tried to 3D print) a whole spools worth of material from all these filament brands.

Grading Criteria

All filaments will be graded on a 4.0 A – F scale, with the final grade for each assessed at the end.

  • Spooling: How well the filament is rolled on the spool.
  • Storage: How long the filament last in storage.
  • Color quality: How well the filament looks before and after printing.
  • Filament quality: Is it flexible, or does it turn into plastic shards?
  • Other: Those other quirks that are unique to all brands of filament.

ColorFabb XT, PLA/PHA, and exotics – filament review

      For major 3D prints and everyday printing, ColorFabb XT is my go to filament. I can print with both 1.75 and 2.85 mm filament in my Taz 5 printer. I’ve been happy with the performance of their XT, PLA/PHA, and exotic filaments. All of them are low warp, which is great on the large prints that I have done with them.

E-Nable Raptor hand 3D printed in ColorFabbXt - filament review
E-Nable Raptor hand 3D printed in ColorFabbXt

ColorFabb has great customer service, which have only had to use once. Their filament comes in bulk 2.2 kg sizes, which is great for commercial 3D printers and long 3D prints.

On the gripe side, the spools for their 750 g and 2.2 kg can be a bit bulky in their width, and require a separate spool holder for your 3D printer. Spooling is a weak point, as I’ve had a few spools (both sizes) tangle mid-print.

Grade Card 

  • Spooling: More of a problem with 1.75 mm filament, but 2.85 mm has tangled as well. B
  • Storage: No degradation of filament with time. A
  • Color quality: Solid consistent color from start to finish. A
  • Filament quality: XT and PLA/PHA have been good to me, though BronzeFill exotic did become brittle. A
  • Other: Starting build plate adhesion can be tricky compared to others. Good selection of colors and sizes, and samples from ColorFabb are enough to make 3-4 small items. A
  • Overall Grade: 19 / 20 A

MakerBot PLA – filament review

MakerBot is one of the leading 3D printing companies in the world thanks to effective marketing, but not the quality of their 3D printers. My first 3D printer was a 5th gen, and I’ll admit that I went overboard in ordering bulk packages of filament from them.

Fidget 3D printed with MakerBot PLA filament - filament review
Fidget 3D printed with MakerBot PLA filament

In a future blog I’ll detail my heartache as I smashed headlong into the 5th gen printer. Despite the cluster fuck that is the 5th gen, Makerbot is redeemed (somewhat) by their filament.

MakerBot 1.75 mm filament is what I started 3D printing with and it has been a great learning experience for filament. I learned that this PLA will warp on long prints without a heated bed, and will warp on the glass build plate of a 5th gen.

It does 3D print at a consistent temperature, and has been shelf-stable longer than other PLA brands I have used. I have liked using their filament, if not their printer.

Grade Card

  • Spooling: Good spooling with no tangles. A
  • Storage: Shelf stable longer than other PLA brands. A
  • Color quality: It has darkened from spool to print; it appears darker than advertised on site. C
  • Filament quality: Solid consistent quality in stark contrast to the 5th gen printer. A
  • Other: Being marketed as an exclusive filament does hurt its appeal to 3D printers. The cost is also overblown like all MakerBot products. D
  • Overall Grade: 15 / 20 C

Prototype Supply PLA – filament review

      This has been the wild card in my filament supplies. I got a couple 1 kg spools from a local 3D printing shop, and it is a good filament for test prints. It prints well at a low 190 C, which is unusual in my experience with PLA, which

Lulzbot Taz 5 tool tray printed w. Prototype supply - filament review
Lulzbot Taz 5 tool tray printed w/ Prototype Supply

normally prints at 200 – 210 C for all other brands. The 1.75 mm filament has performed well in all the test printing I’ve used it for, with minimal warping. The color has not been consistent, but for test printing it does not really matter.

Grade Card

  • Spooling: Good spooling with no tangles. A
  • Storage: Shelf stable and forgiving of bad storage. A
  • Color quality: It has lightened from neon pink to pepto bismol pink when 3D print. Likewise the spool of purple I used lightened as well. D
  • Filament quality: Good performance in both 3D printers, and nice to print at a lower temperature. A
  • Other: This is good for test prints, with low warpage. It was affordable even from a retail store. The color shift was disappointing. C
  • Overall Grade: 15 / 20 C

Printed Solid PLA – filament review

This was a brand that I’ve used a few times for their unique colors. I got some 0.2 kg spools of dark green 1.75 mm filament that turned out to have a honey / gold irradiances to it. When I made some fidgets for the Autism Community Store, they loved the dual colors.
However Printed Solid made this color in a limited production run, so now I’m holding onto my last spool tightly.

Grade Card

  • Spooling: The 0.2 kg spool is tight, and the filament was prone to stress breaks near the end of the spool. C
  • Storage: It did lose its flexibility after 3-5 months, and it became brittle. D
  • Color quality: The two tone iridescent filament produced amazing results on the final product. A
  • Filament quality: On the stiff side coming out of the box, it did become more brittle with time. C
  • Other: Prone to warping. Being a limited production creates some issues if you want to 3D print in bulk. C
  • Overall Grade: 11 / 20 F

Bee Supply PLA – filament review

This was an off brand filament I got from a 3DHubs  customer. He wanted 3 of the Fallout4 Pip Boys printed, and I gave him a discount for providing the filament. This was the first mistake in what turned out to be the 3D Hub order from hell (That is another blog) .

Fallout 4 Pip Boy controler, 3D printed through 3DHubs. - filament review
Fallout 4 Pip Boy controller, 3D printed through 3DHubs.

The client provided me with 3 0.2 kg spools of OD green 1.75 mm filament. It is from these tinny spools I learned the importance of spool size. The filament was wound so tightly around the small spools that they just would not flex enough to get into the print head.

The PLA was stiff from the start. As I ran it through my printer, I learned a new sound could come from my printer. I started hearing a “snap, sprang, click, click” sound as the filament snapped like dry spaghetti, sending bits all around the room. This snapping tended to happen a couple hours into a 6-8 hr print job, resulting in lost days of time on this printing job. This snapping happened to all 3 spools, extending a 1 week printing job into a 3 week cluster fuck.

I finally gave up on Bee Supply and ordered some ColorFabb for the client. To show his gratitude, the client left me the entire Bee Supply filament to deal with. I tried latter to salvage it, but sometimes you just can’t raise the dead.

Grade Card

  • Spooling: Tight diameter spools and even tighter winding turned the PLA into an inflexible spring that would not feed without snapping frequently. F- – – –
  • Storage: The filament did not store well, and fell apart on the spool itself. F –
  • Color quality: What did print did lighten a bit. C
  • Filament quality: Quality and this filament do not belong in the same sentence. Frequent stress breaks and brittle PLA killed many long prints. F – – – –
  • Other: I’m glad I did not buy this crap, but feel sorry for the client that got burned with this trash. F – – – – –
    Overall Grade: 2 / 20 F

How to: Timelapse of 3D Prints

2

Watching 3D printers print is interesting however they are slow, it is much better if you can see those 1,2,3,4 hour prints in 30 seconds to see how a 3D printer works. In this article I will be explaining each step from camera mount to rendering the video. You can use just about any camera for this tutorial : DSLR, compact, Action Camera (eg GoPro). There are two methods to make a timelapse : You can take a long video then speed it up for a timelapse, this is an easier option however it takes up lots of storage space on your camera, computer and will take longer to render. However a more professional method is to take pictures at set intervals then use those pictures to make a video, this is a bit harder but it takes up a lot less storage space and can produce better result. I will be using my DSLR for this tutorial, although you can use just about any camera.

Setting up you Camera mount

Either way you are doing a timelapse you will need a tripod or something stable to place your camera on. We do not want the camera to move during the timelapse as this would produce a bad result. You will need to aim your camera at the object you are printing and make sure there is enough space for the object’s length, height and width. If your bed moves you need to encounter that to position the camera correctly.

Video method

If you are using the video method all you have to do is to start filming the print once its starts and that’s it for now, make sure you have enough storage space to hold this video footage and you have framed the camera correctly.

Photo method

So if you have chosen this method which I recommend, it is a bit more complex to set up.

First of all you will need to calculate how many photos you want. This is some simple maths and estimating how many photos you would want, I would recommend if you don’t want to play around with it is to take about 700- 1200 for a print. I use this for 2 hour prints usually. So we will need to set the interval timer on our camera: On a GoPro the timer is built in and on a compact camera it may or may not be built in, it all depends on your camera. On the other hand for a DSLR you will most likely need an intervalometer, these are little controllers that will plug into your camera and control the shutter. I found mine for about £15, so look around for a compatible one for your camera. Now let’s do the maths:


You will need an estimated print time, you can get this from Cura, Simplfy 3D or other slicers. If your slicer does not give a time estimate you can download Cura (it’s free) just to get a time estimate.

Print time = 2 Hours

Now work out the seconds:

2*60 = 120

120*60 = 7200 Seconds

Now we can try different intervals:

2 Second interval: 7200/2

=3600

4 second interval: 7200/4

=1800

6 second interval: 7200/6

=1200

8 second interval: 7200/8

=900

Okay so I will go with a 8 second interval

So we have our interval; the amount of photos will almost never be exact as the time estimation is always off by a bit. Now if you have an action camera (eg GoPro) set your interval and your ready to go. If you are on a compact camera set your interval (if the camera has an inbuilt timer, if not look at the manual if there is any accessory to help) and if you can set it to sport mode or similar. This will help taking pictures of the print head and the moving bed if you have one. With a DSLR, on your intervalometer set the exposure to 0 or OFF; we will let the camera handle the exposure. You can play around with: shutter speed, aperture etc. but I like leaving it on sport mode and possibly on macro.


Okay so now let your print run and turn on the camera!

Editing

Okay so you have your footage, either a long video or a set of pictures. I will be using a free video editor called Lightworks, but you can do this with pretty much anything including Movie Maker.

Video method

Okay so import your video into the software and create a new timeline.

camera mount

Then drag the video into the start. After that click advanced and  increase the speed to something like 500-600%. This depends on how long you want your timelapse, we can calculate this by dividing the total seconds by the the first digit (if your percentage is a whole hundred between 100- 900):

1200 seconds

1200/5

=240 Seconds (timelapse length)

240/60

= 4 Minutes (timelapse length)

camera mount

Okay so now you want to delete your audio ( if you want) then add music. After that select the clip with markers then export it,  and make sure to tick the “use marked” section. Let it export and you’re done!

Photo method

Set your project to 25 FPS, next you want to import your photos, Lightworks will make them into one video file. Do not press play on the preview or in the timeline, doing so will make the program freeze and lag your computer. Only high end PC’s with SSD’s could possibly do that.

Screenshot (11)- camera mount

Then drag the file to your timeline and I recommend decreasing the video playback speed to about 75% for a longer timelapse. You will need to extend the video clip by dragging the end of the video clip until the video stops, this is because the video will be longer now. Then add music and select the video and audio with markers and export. Make sure to tick the “use marked” section, and you’re done!

Now you should have a timelapse of your print. Feel free to ask any questions in the comments section and I will do my best to answer them. Here is my timelapse I made of printing a low poly Darth Vader (http://www.thingiverse.com/thing:1169476) , although Darth decided to face the wrong way but you get the idea:

https://youtu.be/Y1VmEGVIk8g


Bed auto leveling for 3D Printers

3

Are you tired of re-calibrating the endstop on the Z axis? Or tightening the screws on the bed every day? See how to install the bed auto leveling system using an servo motor and an endstop

What is the bed auto leveling feature?

This feature will use a sensor to measure the distance between the nozzle and the bed, on 3 or more points (up to 32), assuring you the perfect bed leveling and adehesion. See this video to understand how it can be useful!

RepRap Bed Auto Leveling by Alex Borro

Why my bed wont stay leveled forever?

This is a pretty common issue, caused by a lot of variables, like the room temperature, the hotbed temperature, nozzle temperature (all the three causes dilation), humidity, and mostly the structure (like plywood, acrylic and aluminium/other metals), found on Prusa’s and derivated from it.

But don’t worry anymore, now yuo will learn how to implement a Bed auto leveling. This will save you a LOT of time, and also help to make better prints.  The Autoleveling works by measuring the distance from the nozzle to the bed, in the four corners (or more if we want to!),

BEFORE WE START READ THE WHOLE TUTORIAL!,

firmware modifications are DANGEROUS!, make sure that you have some backups of your working firmware before you begin! (trust me, always have a well-documented backup, so you know which one to use if something goes wrong).  After updating your firmare MAKE SURE to keep an eye on the 3d printer,  things can go really bad if you mess with some setting you should not.

So lets begin! Here are some things that we will need:
1 – A Already working 3D printer (we will need to print a support)
2 – 1x 9g servo motor , 1X Jumper (computer jumpers are great)
3 – Cable to connect the servo and the micro to the board (you will need to make one)
4 – A computer with arduino IDE v1.0.6 (version 1.5+ don’t work, more info on the last page)
5 – Marlin firmware v1.0.x pre-configured (newer versions didn’t worked, more info on the last page)
6 – Write your firmware settings (feedrate, acceleration, step/mm and board type. LCD name is also important to write if you have one)

FILES / Links

Recommended links for supports:
-Model1: Support 1
-Model2:Support 2
-Model3: Support 3

Arduino IDE v1.0.6 with u8glib (ZIP) and Marlin firmware pre-configured (ZIP)

Before everything, click on HOME ALL and make sure that your nozzle is INSIDE the bed limits.

imagem 1

Select move X + to move it to the right and do it until the nozzle is at the edge of the printing area. Do the same for Y. For the Z axis, move it as high as its possible and mark those values

imagem2

X Max distance = ?
Y Max distance = ?
Z Max distance = ?

After you print the servo support, and before disassembling the printer check if your servo and micro switch works and fit on the support nicely. And if it does, find a place to put the support, it should be as close as possible to the nozzle.
After checking this and test, we will mount the servo support, the servo, and the endstop on the end. Make sure you leave enough wire to the endstop move free,

Installing the Servo motor

Here is a image to help you with the SERVO connector

Usually the pins are
BLACK / BROWN = NEGATIVE (-)
RED = POSITIVE (+)
WHITE / ORANGE = SIGNAL (s)

img3

Let’s begin to modify the RAMPS. Here are where you will connect things
YELLOW = Servo motor (negative , positive, signal)
BLUE = the reset switch (only for demonstration)
RED = The pins that you need to jumper. (Here you jumper the 5V and the VCC pins. The mid and bottom pins) – This will provide power to the servo

img4

After connecting them, connect the probe endstop (which was the Z endstop), to the min z endstop (exactly where it was before)

Configuring the OFFSET

Hardware mounted. now we need to check the offset from the hot end to the probe center.

We will use this method included inside a read-me file
a) Make a small mark in the bed with a marker/felt-tip pen.

b) Place the hotend tip as exactly as possible on the mark, touching the bed. Raise the hotend 0.1mm (a regular paper thickness) and zero all axis (G92 X0 Y0 Z0);

d) Raise the hotend 10mm (or more) for probe clearance, lower the Z probe (Z-Endstop) with M401 and place it just on that mark by moving X, Y and Z;

e) Lower the Z in 0.1mm steps, with the probe always touching the mark (it may be necessary to adjust X and Y as well) until you hear the “click” meaning the mechanical endstop was trigged. You can confirm with M119;

f) Now you have the probe in the same place as your hotend tip was before. Perform a M114 and write down the values, for example: X:24.3 Y:-31.4 Z:5.1;

g) You can raise the z probe with M402 command;

Now, open the pre-configured firmware that we provided you on the arduino IDE. Open the configuration.h file. And use control + F to easily find those lines

h) Fill the defines bellow multiplying the values by “-1” (just change the signal)

X_PROBE_OFFSET_FROM_EXTRUDER -24.3

Y_PROBE_OFFSET_FROM_EXTRUDER 31.4

Z_PROBE_OFFSET_FROM_EXTRUDER -5.1

Configuring the probing positions

The following options define the probing positions. These are good starting values I recommend to keep a better clearance from borders in the first run and then make the probes as close as possible to borders:

 LEFT_PROBE_BED_POSITION 30

 RIGHT_PROBE_BED_POSITION 140

 BACK_PROBE_BED_POSITION 140

 FRONT_PROBE_BED_POSITION 30

REMINDER: the values must be bigger than the offset!. Example, when the X axis on 0mm, the nozzle is also on 0, but the probe will be at 20. So those values must be inside the range that the printer can measure.

A few more options:
* #define XY_TRAVEL_SPEED 2000
X and Y axis travel speed between probes, in mm/min.
Bear in mind that really fast moves may render step skipping. 6000 mm/min (100mm/s) is a good value.

  • #define Z_RAISE_BEFORE_PROBING 20
  • #define Z_RAISE_BETWEEN_PROBINGS 20

The Z axis is lifted when traveling to the first probe point by Z_RAISE_BEFORE_PROBING value
and then lifted when traveling from first to second and second to third point by Z_RAISE_BETWEEN_PROBINGS.
REMINDER: the raise before probing must be GREATER than the Z offset. if it the offset is 20mm, add 10mm, so 30mm is a good value to use.
All values are in mm as usual.

We will now configure the software. If you use REPETIER HOST or another, you need to find where the “before printing” or “starting script” is and add this two lines

  • G28
  • G29

The G28 means, go home printer!, it will make the printer find the home position of everything. Than, after that, the G29 will tell the printer to auto calibrate itself,

img5

Now, if everything was properly configured. You must try printing something. I recommend printing a cube, with a four lines skirt at 20mm of distance, this way you will see if the auto calibration works.

FAQ

Why I must use the provided firmware? I don’t like it!.

-this firmware had been tested and worked perfectly. Although its old, it doesn’t means that it is bad. This is a really good firmware!.

Why I need to use the provided arduino IDE?

-From version 1.5.x the WIRE library is not at the same place, making it really hard to make the firmware works. So, is best to use the 1.0.6 version if you are not a advanced programmer.

What are those G-codes?

M401 = Lower the servo probe
M402 = Retract the servo probe
G28 = Home on X, Y, Z
G29 = Auto leveling feature

If you have any question please feel free to ask! Also See My Auto Nozzle Clean post click here!

How to Justify a New 3D Printer

0
Addivist mainfiseto
3D Addivist Manifesto, for the future 3D addivist cookbook. A primer on how 3D printing will change the world

3D printers are an emerging and exciting technology field. As printers continue to grow, the cost is will continue to plunge, but a decent printer still runs $300 and up. If you have not purchased one yet, you may be looking for reasons to justify buying a 3d printer .
Others around us (family, significant others, friends) are skeptical. They ask “Why would you want a 3D printer when you can drive down the street to a big box store to get what we need? Why get a machine to make trinkets?”
How can you justify the expense and time needed for a 3D printer? If you need help convincing others, here is my list of ways that I have convinced others.

Work for Humanity – buying a 3d printer

By getting a 3D printer, you can become a humanitarian. The internet is full of cute pets getting 3D printed limbs.

3D printers can become a volunteer for e-NABLE and 3D print affordable prosthetic hands for children.

eNable group - buying a 3d printer
e-NABLE logo. You can 3D print hands for children

3D printers can also print items to help people with special needs. Recently Thingiverse hosted the AssistiveTech challenge, where the design community competed to 3D print items for the elderly and people with unique needs.

makethon - buying a 3d printer
Red Cross of India Enable Makeathon, to make items for people with disabilities.

The International Committee of the Red Cross of India (ICRC) recently hosted the Enable Makeathon. This event challenged designers from around the world to make tools for people with disabilities in rural and impoverished areas. 3D printing was a pivotal tool for many design teams including 3DPT. In the challenge, I used 3D printing to make handwriting grips to support students education.

Home Improvement – buying a 3d printer

     When it comes to home improvement, 3D printing can cover a wide range of home repair and improvement needs.File sharing sites are full of files to replace all those broken knobs, little plastic do doodads, and kitchenware you break.

Not only that, you can 3D print your own decore` to truly customize your house. Forget going to Ikea, you can truly design and build your own pieces to make your house a home.

Knife switch plate from Young Frankenstein. - buying a 3d printer
Knife switch plate from Young Frankenstein.

For sci-fi fans, you can bring Star Wars or Young Frankenstein into your room. A popular knife switch plate was made from the movie Young Frankenstein, so now you too can “throw the third switch”! Better yet, you can print it with ColorFabb glowfill so you can find the light switch at night.

If you live in a historic house, 3D printing can help you in restoring it to its original beauty. 3D printing has been used to recreate molding profiles and tile work. It can also reproduce ornate decor` and details that would cost you thousands to make with a craftsmen.

Toys – buying a 3d printer

    Yes, you can 3D print toys. Unlike the toys you get from big box stores, they are far more affordable; a hand sized toy can cost ~$0.20, while bigger toys cost less than the gas it takes to drive to the store. With 3D printing you can print spare toys for when your little wrecking crew turns their toys into shards.

Not only are 3D printed toys affordable, they can be safer. With 3D printing you know where the toy was sourced from, including the materials. This greatly reduces the risk of toys from Asia that are contaminated with heavy metals. If your little ball of joy is a biter, you can 3D print the shells of any toy thicker to extend the life of the toy. With 3D printing toys tend to be large and with few pieces that pass the choke test, so you don’t have to worry as much about kids swallowing them (though you should ALWAYS supervise children and toys).

Ownership

     3D printing something for another person can give it far more intrinsic value than something from a store. Owning something you make is far more valuable than buying.

In our consumer society, we are encouraged to throw away things on a constant basis; whether its due to poor quality, planed obsolescence, or normal wear. With 3D printing we are encouraged to maintain, reuse, and adapt what we have.

3D Addivist Manifesto, for the future 3D addivist cookbook. A primer on how 3D printing will change the world - buying a 3d printer
3D Addivist Manifesto, for the future 3D addivist cookbook. A primer on how 3D printing will change the world.

Making something in this consumer society is revolutionary. 3D printing is poised to be the next industrial revolution, where consumers 3D print what they need in house. This will greatly reduce our dependence on big box stores and foreign imports.

Ethics – buying a 3d printer

      Big box stores rely on wage slave labor from Asia to mass produce cheap consumer goods. 3D printing what you need in house is far more ethical then supporting big box stores.

By 3D printing, you know where your item came from, and the working conditions of the labor involved.

Environment – buying a 3d printer

      3D printing just what you need uses far less energy than a factory that mass produces the same item. 3D printing can greatly reduce the amount of greenhouse gases that come from industrial factories and transportation.
Getting 20 – 40 objects from a kg of filament that is sourced domestically is far better for the environment than transporting the same objects from overseas.

Economy – buying a 3d printer

     With sites like 3Dhubs(link my hub), you can make money on the side to get a return on investment (ROI) for the 3D printer. You can 3D print locally, supporting the community around you. By 3D printing locally(Adivist manifesto?), you inject money into your local economy, with taxes supporting your local schools and public services.

http://www.businessinsider.com/the-next-industrial-revolution-is-here-3d-printing-2014-8#ooid=JpazZzbzpN2PAI7zlvboy3cQ7RiqRiou

If you add more printers, you can become a small 3D printing business that supports the local economy.
3D printing is set to become the next industrial revolution. It will mean that commercial production returns to domestic markets. 3D printing can reduce our need for foreign imports, improve our employment rates, and decrease homelessness.

How can we justify buying a 3d printer?

    When it comes to 3D printing, the better question is “How can we NOT justify it?”
In the future there will be 3D printers in the majority of homes in the US. 3D printing is a technology that is changing the world for the better as I write this.

Marlin a beginners guide

2

So many times it seems the simplest thing is the most complex and annoying, like a dirt road that you just can’t get to the end of but there is hope a light at the end of the tunnel. Marlin is one of the many flavors of code that is used to run a 3d printer. It is an operating system of sorts in a basic machine level code. Hence the reason so many people get lost in it. Marlin can be a bit daunting at first and everyone thinks well if I change it how do I know what is the right thing to change well I am going to walk you through the basics of what is necessary to more or less get it working.
To begin with there is one simple basic rule read, read the entire thing no it won’t make any sense to you that’s ok but read the whole thing a few times over get a feel for the word structure and take not of how its laid out it is that way for a reason, the programmer laid it out so that 1 it was in clusters or groups that like over each other 2 you could jump from section to section to define the necessary parameters as needed and 3 it makes it simple to solve a problem because all the code for that one part is right there grouped together.

Various types of firmware

There are several flavors of firmware some are brand specific others are generic and can be used with any type of 3d printer there are also a few that are only for CNC machines which are simmiler but very different to 3d printers.
1 Sprinter
2 Teacup
3 sjfw
4 Marlin
5 Sailfish
6 Grbl
7 Repetier-Firmware
8 Aprinter
9 RepRap Firmware
10 ImpPro3D
11 Smoothie
12 Redeem

Further reading go here => http://reprap.org/wiki/List_of_Firmware

These are the most common and regularly used flavors out there but were going to stick with marlin as our base of reference since that is what most 3d printers use.
firmware Marlin
Firmware just what is it?
Firmware is the code which resides on the printer’s motherboard. The firmware is the link between software and hardware, it deciphers commands from the G code and controls the motion of the 3d printer accordingly. The firmware configuration is unique to your 3d printer. It knows the properties of the 3D printer, like the dimensions or heating settings. It plays a major role in the quality of the print and how the machine works. So how do you work with in the firmware to make it work for you?
Well first you are going to need an Arduino board and a ramps board as they are the most common and the most cost effective to buy. Then you will have to pop on over the Arduino site and grab a copy of their software it free to download and use here is the link for the site https://www.arduino.cc/en/Main/Software download and install this is where we will be able to see the firmware and make any changes that we want.

Programming rule #1: comments

Sometimes we need help and comments to understand the programmer, but we don’t want the computer to see the comments so we use separators. In Arduino IDE the separator between computer language and comments is a double slash //, it works for every line. The compiler will not try to read after this separator. This is the only programming rule that we need to understand to configure the firmware properly. Sometimes we will activate some options by removing the comments and other times we will comment-out options to deactivate them
Ok so let’s open the file Configuration.h in the Marlin folder.
Got it open? Ok great let’s have a look here and get a basic rundown of what you are looking at
Baud rate this is how fast the computer can talk to the 3d printer so well Set the communication speed in baud to: #define BAUDRATE 250000
This is a base point that most 3d printers can communicate on so like a bit faster others a bit slower but you will know if you need to drop it down or raise it when you connect it and you run a few tests.
There are two speeds commonly used by 3D printing software, the 250000 and 115200 baud rate. If one doesn’t work with your hardware or software, simply try the other one and see if that works.

Motherboard

Just above the line: #define MOTHERBOARD you will see a list of different motherboards. You have a list of boards find yours and use the appropriate number. For example a RAMPS 1.3 / 1.4 (Power outputs: Extruder, Fan, Bed) will be configured:
#define MOTHERBOARD 33
It doesn’t matter if you don’t use a fan or heat bed for now.
Defines the number of extruders
If you use more than one extruders you can write it there.
#define EXTRUDERS 1
Thermal Settings
Temperature sensor choice
Among the list (in configuration.h), choose the thermistor number that you use for each of the hot ends and for the heat bed. Caution should be taken here If you pick the wrong number, you will get an inaccurate temperature reading.
#define TEMP_SENSOR_0 1
#define TEMP_SENSOR_1 0
#define TEMP_SENSOR_2 0
#define TEMP_SENSOR_BED 1
TEMP_SENSOR_0 is used by the first hot end and TEMP_SENSOR_BED is connected to the heat bed. If you don’t use a sensor, use 0 to disable it.
Minimum temperature
Use a minimum temperature different than 0 to check if the thermistor is working. This security will prevent the controller from heating the hot end at max power indefinitely. This is important. It should already be set by default
#define HEATER_0_MINTEMP 5
#define HEATER_1_MINTEMP 5
#define HEATER_2_MINTEMP 5
#define BED_MINTEMP 5
units are in °Celcius

Maximum temp

Depending on your hardware material your hot end will have a specific maximum temperature resistance. This security will prevent the temperature from going over it. For example a J-Head extruder may use a PTFE tube to guide the filament in the hot zone which can be damaged over 240°C. Notice the controller can overshoot the target temperature by a couple of °C, it is better to keep a security margin here.
#define HEATER_0_MAXTEMP 230
#define HEATER_1_MAXTEMP 230
#define HEATER_2_MAXTEMP 230
#define BED_MAXTEMP 120
PID temperature controller.
This is an advanced option which needs to be tuned later. For now you can use the default options.
Prevent dangerous extrusion:
These settings are set by default.
For a security reason you may want to prevent the extrusion if the temperature of the hot end is under the melting point of the material. You don’t want to push the extruder over solid material and risk breaking it.
#define PREVENT_DANGEROUS_EXTRUDE
If there is a mistake in the code like a dot position for example, you would want to prevent a very long extrusion command.
#define PREVENT_LENGTHY_EXTRUDE
Here you can set the values for the minimum temperature:
#define EXTRUDE_MINTEMP 170
Mechanical settings
End Stops
End stops are switches that trigger before an axis reaches its limit, It will move each axis in a specific direction until it reaches an end stop, this is the home for the printer.

Pull-ups resistances
It is a good practice to use a pull-up or pull-down circuit for a basic switch. To keep it simple the pull-ups resistance are needed if you directly connect a mechanical end switch between the signal and ground pins.
Fortunately there is already a pull-up resistor integrated in Arduino that can be activated via the software.
Web links for more specific info on that can be found here:
http://en.wikipedia.org/wiki/Pull-up_resistor
http://arduino.cc/en/Tutorial/DigitalPins#.UyusMYXDIlp

#define ENDSTOPPULLUPS // Comment this out (using // at the start of the line) to disable the end stop pull-up resistors
The Marlin firmware allows one to configure each limit switch individually. You can use multiple end stop types on the same printer.
For a total of six that’s 2 for the X axis 2 for the Y axis and 2 for the Z axis, one each for the MAX and 1 each for the MIN (front back top bottom left and right of the printer)

#ifndef ENDSTOPPULLUPS
#define ENDSTOPPULLUP_XMAX
#define ENDSTOPPULLUP_YMAX
// #define ENDSTOPPULLUP_ZMAX
#define ENDSTOPPULLUP_XMIN
#define ENDSTOPPULLUP_YMIN
// #define ENDSTOPPULLUP_ZMIN
#endif
Invert end switch logic
Some limit switches are normally closed (NC) and turn off when triggered and some are normally open (NO) and turn on when triggered. Ideally the limit switches would be normally on and turn current off when triggered. The printer would interpret the same signal if the end stop is hit as if the end stop is broken or disconnected.
NO = true
NC = false
const bool X_MIN_ENDSTOP_INVERTING = false;
const bool Y_MIN_ENDSTOP_INVERTING = false;
const bool Z_MIN_ENDSTOP_INVERTING = false;
const bool X_MAX_ENDSTOP_INVERTING = false;
const bool Y_MAX_ENDSTOP_INVERTING = false;
const bool Z_MAX_ENDSTOP_INVERTING = false;
Use three or six end stops?
Under normal circumstance the printer only needs 3 the zmin xmin and ymin this is how it finds the home position but on some printers they “get lost” and you have to set up a xmax ymax and zmax so that the printer can know where the edges of the build plate are
Uncomment the following lines to disable all max or all min end stops.
//#define DISABLE_MAX_ENDSTOPS
//#define DISABLE_MIN_ENDSTOPS
Invert stepper motor direction
There is only way to know if the stepper motor direction is correct you have to try it. I would wait until the configuration is completed, compiled and sent to the controller before you try. You can come back here after know if there is a problem or not.

1: Position the printer axis at the center of each axis.
2: Keep your finger close to the stop button.
3: Send a command to move the X axis a little amount like +1 or +10 mm
4: If the printer moves in the other direction, you will have to reverse the axis direction.
5: Repeat for each X Y Z axis
To inspect the extruder you would need to heat the hot end to the extrusion temperature load a sample of filament and Send extrusion command of 10 mm and check the motor rotation direction.
You can invert the stepper motor direction if it was wired the wrong way. It doesn’t make a difference if you invert the stepper motor wiring or if you invert it in the code. *Remember to power off the printer before unplugging or replugging the stepper motors.
#define INVERT_X_DIR false
#define INVERT_Y_DIR true
#define INVERT_Z_DIR true
#define INVERT_E0_DIR true
#define INVERT_E1_DIR true
#define INVERT_E2_DIR false
Set home direction

Here we set the home direction when the home button is pressed. It tells the printer which direction it should go to reach the end stop and get its reference position.
#define X_HOME_DIR -1
#define Y_HOME_DIR -1
#define Z_HOME_DIR 1
The Z axis is the one which will get the printing surface very close to the nozzle. It needs to be very precise and very quick to trigger otherwise there will be a collision between the nozzle and the surface and this can damage the heat bed and the hot end

If you use optical end stops for instance you can position the end stops at the center of the moving area. You can tell the printer to move over the end stop signal. I never use it. If you placed end stops at the end of each axis, then keep these options set to true. (I highly recommend not using optical stop ends not because they don’t work but they are hard to calibrate and keep calibrated with the printer)
Don’t go over the minimum limit:
#define min_software_endstops true
Don’t go beyond the maximum limit
#define max_software_endstops true

Printer area
Here we can define the print size in the firmware by telling it what the limits are of the travel zones. The travel distance is not calibrated yet and the practical distance will be different than the calculated distance. So for now it is better to reduce the travel distance to less than the actual size once were sure it works we can come back and change it then
#define X_MAX_POS 190
#define X_MIN_POS 0
#define Y_MAX_POS 190
#define Y_MIN_POS 0
#define Z_MAX_POS 190
#define Z_MIN_POS 0
Movement settings

Define the number of axis
It is the total number of axis (3) plus the number of extruders (1).
#define NUM_AXIS 4
Homing feed rate
This is the moving speed of the axis when homing in [mm/min]. Oftentimes in Marlin, speed or acceleration are expressed in [mm/s] or [mm/s2] but the feed is expressed in [mm/min].
#define HOMING_FEEDRATE {5060, 5060, 4*60}
Axis steps per unit
The stepper motor receives step by step moving command from the controller. The controller needs to know the steps/mm ratio to send the appropriate steps to reach the required distance.
Just how many steps are needed to move an axis by 1 mm?
Belts and pulley (usually x y axis):
steps_per_mm = (motor_steps_per_rev * driver_microstep) /
(belt_pitch * pulley_number_of_teeth)
lead screw (z axis)
steps_per_mm = (motor_steps_per_rev * driver_microstep) / thread_pitch
Direct drive extruder:
e_steps_per_mm = (motor_steps_per_rev * driver_microstep) /
(hob_effective_diameter * pi)

Extruder with gear reduction:
e_steps_per_mm = (motor_steps_per_rev * driver_microstep)
(big_gear_teeth / small_gear_teeth) / (hob_effective_diameter * pi)
DEFAULT_AXIS_STEPS_PER_UNIT {X,Y,Z,E1}
#define DEFAULT_AXIS_STEPS_PER_UNIT {80,80,200.08/3,760}
Send the firmware to the 3D Printer via Arduino

In Arduino IDE, save the modification done to Configuration.h
Verify the code
If everything is fine, Arduino should say “Done compiling” otherwise you will get one or more error messages. If this happens, there is usually a mention about the line of the error. Check your code for a comments error //, dots or other special characters that may have been mistyped.
Once it is compiled properly you can connect the Arduino board to the computer with the USB cable.
Select the proper port, Tools menu / Serial Port /
Upload the compiled code to the Arduino

Now your printer is ready to move. It’s alive!!! Yes you did it you have set up your own custom firmware for your printer!

But wait there is still more……. Test the stepper moters make sure they move like there supposed to
Just one more thing. You need to try the stepper motor direction as mentioned above. You will need to use a host software connected to the 3D printer. The instructions to use this software will be explained in another post, for now I will stick to the basic guidelines.

You can find more info on Pronterface here: http://reprap.org/wiki/Pronterface
You can also use Repetier –host which has an awesome G code viewer: http://www.repetier.com/documentation/repetier-host/gcode-editor/
To test the motor direction, connect the printer to the computer with the USB cable.
Position the printer axis manually at the center of each axis.
Power up the printer
Open a host software like Pronterface or Repetier-host
Click to connect the host to the printer
Keep your finger close to the stop button of the motherboard (just in case).
Send a command to move X axis a little amount like +1 or +10 mm


If the printer moves in the other direction, you will have to reverse the axis direction.
Repeat for each X Y Z axis


To inspect the extruder you will need to heat the hot end to the extrusion temperature, load your filament and make a mark on it with a marker so you can see it. Then send the extrusion command of 10 mm and check the motor rotation direction.

as a final note
You can invert the stepper motor direction if it was wired the wrong way, it doesn’t make a difference if you invert the stepper motor wiring or if you invert it in the code. *Remember to power off the printer before unplugging or replugging the stepper motors.
#define INVERT_X_DIR false
#define INVERT_Y_DIR true
#define INVERT_Z_DIR true
#define INVERT_E0_DIR true
#define INVERT_E1_DIR true
#define INVERT_E2_DIR false

Dont forget to join the Marlin Group on Facebook Click here! 

Selecting Good 3D Printing Filament

0
Beer filament
3D filament made from Beer waste products

You just spent a few paychecks on a fused deposition modelling (FDM) type 3D printer. Desktop printers use plastic filament as the source materials to 3D print an object on these printers. How do you selecet the best 3d printing filament?

Beer filament
3D filament made from Beer waste products – best 3d printing filament

Just like inkjet printers, there are good and bad brands of filament. There are also other factors to consider when you order filament. Here is my list of things I found out the hard way to look for when it comes to getting good filament.

What are you 3D printing?

This may seem like a dumb point, but it really should be your first consideration. Are you printing a car part that will require nylon/Kevlar, or a simple toy that can use PLA?

Carbon Fiber filament from Colorfabb - best 3d printing filament
Carbon Fiber filament from Colorfabb – best 3d printing filament

      Something that all printers are guilty of is buying filament for the WOW factor alone. We see blogs that report on a new filament made of beer or carbon fiber, and we quickly buy it online before considering what we will even want to print with it. After dropping serious cash on exotic filaments, I’ve seen many printers print items that were just fine printed in PLA. They also are stuck with a spool of expensive filament that they become gun shy about using. The end result is a spool of exotic filament that sits on a shelf, becoming brittle and difficult to run through their 3D printer.

Wich one is the best 3d printing filament?

This is another consideration that printers forget when they are looking at different materials. Not all 3D printers can handle the temperatures for every filament. Other 3d printers may say they can, but in reality can’t cope with the viscosity of certain materials. For this you will have to do research for your 3D printer. Look on Facebook or other forums to see what people have experienced with different materials and your 3D printer. Never trust the reviews you see on Amazon. Printers have already tried running every filament through their printers, so you might as well learn from their mistakes.

Storage

For this point you have to think about how much you use your 3D printer. If you use your 3D printer occasionally, storing filament between prints becomes a concern.

PLA filament is the main offender in this category. PLA has to be stored in a cool, dry place when not in use; otherwise it turns into stiff brittle plastic bits in a few months. I’ve had spools of PLA go bad in as little as 3 months. If you 3D print daily, you can use up PLA before it goes brittle.

Other filaments have a better shelf life, but should be likewise stored in a cool, dry place. You will have to check with the manufacture and online for their recommendations.

Spooling

spool diagram - best 3d printing filament
Diagram of the parts of a filament spool. – best 3d printing filament

How the filament is rolled on the spool makes a world of difference. I have experienced more heartache from bad spooling than anything else in 3D printing. At the factory, warm filament is wrapped around the spool. As the filament cools, it tightens and forms to the radius of the spool core. This results in the filament coming off the spool in an arch. If the core is too small, the filament will snap instead of feed smoothly into the hot end.

I hit a problem with off-brand filament spools. The diameter of the core affects how the filament feeds as it reaches the end of the spool. What I found is that the filament at the end of the spool tends to have a tighter radius and be a bit more brittle. When you run a long print, that may result in a print dying after 6-8 hrs.

Off brand filaments can come on spools with a core 30 mm OD. While this makes for a smaller spool, it turns the filament on the end into a brittle spring instead of proper filament.

The worst I found for this was Bee Supply filament. A client gave me 4 0.2 kg spools of their PLA, and every one turned into shards because they were wound around the tight spool radius.

When you get the spool, look at the filament on it. Is it wound so tight it has started fusing to itself? Is it so loose it falls off the spool?

    Is it uniform and lying flat? Are their loops sticking out and bumps in the filament? Badly spooled filament will tangle as it rotates. This tangle will prevent feeding, which will clog the printer head and burn out the motor.

How to test your filament

a. Cut a section about 100 mm long.
b. Look at it closely, and under a magnifying lens if possible. Do you see any bubbles or hairline cracks? Bubbles come from bad extrusion, and are weak points that the filament can snap at. Check other parts of the filament to see if there are any bubbles. If there are a lot of bubbles, your filament may turn into shards.
Hairline cracks can be from stress or bad mixing at the factory. If there are a lot of cracks, run a test print at a slow feed rate to make sure the filament does not turn into bits.
c. Roll the sample straight in your hands like a clay snake. Does it straighten out, or does it fight you? If the filament is not flexible, consider running this at a slower feed rate.
d. Bend the sample around. Is it flexible enough to bend into a tight loop, or does it snap instead? Good filament will bend and kink before breaking, while brittle filament will snap like dry spaghetti.
e. If there is any doubt after this, run a test print. Many printers have test files built in, or you can find them online.

What is a best 3d printing filament?

Good filament should come cleanly off the spool. It should be flexible enough to bend around the feed tube into the printer head. Filament should be continuous enough that it flows uninterrupted through the hot end. It should print at the temperature listed for the material.
If you want to try new brands and filament materials, look around at forums for 3D printing to see how they perform.

3D printing, Jurassic World, STEM Education

2
DAN building blocks
DNA manipulative set, designed by the Author

The US is making efforts to improve science, technology, engineering, and math (STEM) education. As a science teacher, I am always looking for new ways to help my diverse class of students.  Thanks to 3D printing it is now possible to make affordable models of complex ideas in science (3D printing on education). Traditionally schools had to save up and fund raise to purchase science equipment from specialty companies. But with school funding stagnant, science teachers are often stuck making equipment from craft supplies, or buying them out of their own pocket. The budget this year for my science class is around $200, to use for around 50 students.
Another problem in science education comes when we teach complex topics like genetics to our students. Most curriculum for genetics are based from the textbook and videos. For students that are not visual learners, DNA becomes a foreign language. In my high school bio class, many of my students are kinesthetic learners. They need hands-on labs and activities to remember the lessons.

“I CAN PRINT THAT!!! ” – 3D printing on education


DAN building blocks - 3D printing on education
DNA manipulative set, designed by the Author

The 16 year old biology textbook we use had an activity to make a model of DNA with paper cutouts. Like all 3D printers, when I saw that I said the mantra of many 3D printers, “I CAN PRINT THAT!!! ”
After a couple hours in TinkerCAD, I took the textbook design and turned it into 3D printable building block set that can be found here.

After 3D printing and testing the DNA set, I realized that I had something I could build on in the future. The beauty of 3D printing is that a teacher can quickly build more content into their 3D printed creations. This lead me to submit my DNA set to the Thingiverse MakerEdChallenge.

Field Testing

Any teacher can tell you that a lesson plan is good until the students show up. As I started the class, it was clear they were interested in the DNA set that I made. As I had them model DNA, I could tell that they were enjoying the feel of the tiles and how they assembled into DNA. They modeled DNA, RNA transcription, and protein synthesis with the set, and I was amazed at how quickly they were able to do it without guidance from me.
The students continued to impress me with how quickly they learned from manipulating the DNA tiles. As I challenged them further, they were able to solve the problems through the DNA tiles.

RNA expansion set designed by the author. - 3D printing on education
RNA expansion set designed by the author.

Expansion – 3D printing on education

Over the next couple of classes I expanded upon the original set. I wanted my students to practice transcribing mRNA into amino acids, so I designed an amino acids expansion set.

Indominus Rex from Jurassic World, featuring DNA in the background - 3D printing on education
Indominus Rex from Jurassic World, featuring DNA in the background

Another students asked about gene splicing and the film Jurassic World. My first thought was “Rock ON!!!”.

Then I realized in the teachable moment I could expand on the DNA set further to make a set of restriction enzymes.

DATA Driven results – 3D printing on education

The next week I had the students demonstrate their knowledge with the DNA set. They were able to build a model of DNA, transcribe it to RNA, and produce a protein from it. All without a word of correction from me. As a teacher those moments of comprehension are valuable.

3D Printing for Teachers 

3D printing is an amazing tool for Teachers. They can make models of complex science ideas. Another positive is that teachers can quickly replace lost and stolen parts, or make more if their class size increase. These models can then be stored or shared with other science teacher. There are whole catagories on file sharing sites for education.

    Thingiverse has even hosted design challenges for education, including the recent MakerEd challenge.
Teachers can 3D print replacement parts for items that the school can no longer find. As a teacher I’ve been driven mad by lost projector lens caps, tape dispensers, and pencil boxes.
Teachers can also share their work freely with the world. Free is a teachers favorite world, and thanks to file sharing sites, teachers can find the files for anything they need in class.
Teachers also benefit from 3D printing by differentiating to learning styles in class. They can now use 3D printed items to help kenisteic learners, and Special Education students. Now they can show to parents and administrators that they are fulfilling their legal obligations in class with 3D printed items and lessons.

3D printing on education

Students stand to benefit the most from 3D printing. For them 3D printing is accessible and easy to use. With 3D printers in schools and public libraries, students are learning how to make their own items in school. They are also combining 3D printing with other technologies.
Students also benefit when teachers use 3D printed models to demonstrate complex ideas. STEM is quickly adopting 3D printing as a major tool in education. Students also benefit from using 3D printed models in the classroom.

The Tantillus Part 1

2
3D printed Tantillus

The Tantillus 3D Printer

First Tantillus ever.

Is a truly portable opensource 3D printer . Tantillus provides easy computer-less printing in a stunning beautiful small package. With the ability to reproduce its entire case Tantillus comes the closest any RepRap has become to being a self reproducing machine.

The designer of the Tantillus on youtube

Sublime and the Tantillus

Please click the link above to watch and see what you are going to build

Background information

The RepRap project was conceived in 2004 by Dr. Adrian Bowyer to build an opensource machine capable of making usable items in 3 dimensions and eventually be able to make complete copies of itself. Only a short time after the idea had been seeded the RepRap project was born. In the spring of 2007 the very first Replicating Rapid-prototyper was built at Bath University in the U.K. which started a landslide of development over the past 5 years to bring us to this point. Essentially we now have a desktop factory for your home capable of making replacement parts for all your broken toys, gadgets and remote controls missing battery covers.

Why is it needed

If your friends ever wanted parts or if you wanted to go to a maker faire you had to carry round an i3 or Makerbot which to me is sheer madness – each time you have to reset everything  , so portability was required and the  Tantillus was born to meet this need.

First Tantillus ever.

Features

  • Compact case (240mm x 240mm x 300mm).
  • Light weight (4kg with power supply).
  • Capable of reproducing its entire case.
  • Commonly-available parts.
  • Computer-less printing via LCD screen and SD card.
  • Mobile printing.
  • High speeds of 300mm/s + are possible.
  • High resolution printing (X/Y step resolution of 8 micron per step,  Z step resolution of 0.4 micron per step) minimum X/Y radius limited by nozzle diameter, Z resolution limited by the properties of the plastic being used.
  • Quiet operation.
  • Build area of 100mm x 100mm x 100mm.

What can it do

Most items available on Thingiverse fit on Tantillus’ build platform.

You can also design your own parts using a CAD package and also replicate all the parts and build another one!

It does not have a heated bed as a standard so printing with PLA is the best option.

Where can I get one?

Well unless you can find a ready built one somewhere online you will have to build it yourself and source all of the parts.

What you will need – without all of the specifics

  • 1   –   Hardware kit
  • 1   –   Acrylic parts kit
  • 1   –   Printed parts kit
  • 1   –   16×2 LCD screen.
  • 1   –   SD card break out board.
  • 1   –   20 click encoder.
  • 2m –  10way rainbow ribbon cable.
  • 4   –   1×4 2.54mm (0.100″) connectors.
  • 2m –  14g zip black/red zip wire.
  • 1   –   Roll of 8mm Kapton tape.
  • 2   –   J-head hotends. 0.5mm and 0.35mm (0.5mm recommended to start, 0.35mm is for experienced users with patience)
  • 4   –   Nema 17 stepper motors.
  • 1   –   Electronics. (RAMPS)
  • 4   –   Stepstick stepper drivers.
  • 1   –   90watt laptop power supply.
  • 1   –   Q type power connector for power supply.
  • 30cm – Heat shrink tubing. (2.5mm and 3.5mm)
  • 1   –   2gb SD card.
  • 2   –   12v 40mm fans.
  • 4   –   Crimp connectors for hotend.
  • 1   –   3mm glass build surface.
  • 1   –   Roll of 50mm 3M Scotch blue tape.
  • 1   –   Hex keys for supplied hardware kit.

What do I do when I have all this stuff

Download this [download id=”939″] – This is the link to everything technical that I could find.

So you have all the hardware , the Laser cut frame , the 3D printed parts – if you cant get anything then reply on this blog as I am able to help you find what you need.

Time to sort out your workshop or work area

You will need some tools – this is what I feel is the minimum amount that you can get away with

  • Utility knife

  • Drill

  • Sand paper

  • A hex set in millimeters

  • 13mm spanner

  • Pliers

  • Soldering Iron & Solder

  • Wire Stripper

  • Wire Cutters

  • Wire Crimpers

  • Assorted drill bits

  • Tap and die set

Make sure your work area is clean and tidy  and safe to work in . Health and safety is of paramount importance.

Finally make sure you have somewher{e to go for help and guidance during your build.I would suggest the forum on here,your local hackerspace ,maybe good old Facebook and the guys on github.


So we are ready to get started – In part 2 we will be building a Tantillus


Censoring 3D Printed Guns

0
Censored Gun
A Censored stamp over a picture of the Liberator 3D printed gun

Are the digital files for 3D printable gun an object, an idea, or military secrets? How do we as a society designate the digital files for physical objects? Should we censor digital files the same way we have censored print media in the past? Can we even censor anything in the age of the internet?

All of these are amazing legal and social questions that we have to face as 3D printing becomes quickly mainstream.
In a previous post, I discussed how the fears of a 3d printable gun are over-hyped by tabloid media. Now I want to take a look at 3D printed guns in depth.

Digital, physical or other?


Cura view - 3d printable gun
A digital view of 3D printable objects, designed by the author

All 3D printed objects start life as a digital file. The idea for a physical object is designed in a CAD (computer aided drafting) program, and then converted into a digital code that can be read by a 3D printer. The 3D printer then takes the file, puts it into a slicer program to 3D print the object.
With this concept, a 3D printed gun exists on two planes as digital and physical matter.

As a digital matter, the codes for 3D guns are digital instructions for a 3 dimensional shape that can be seen on a computer screen. It has no physical form that can cause physical harm to anyone. The digital files are subject to laws regarding digital information.

The physical object 3D printed from the digital files show. Designed and 3D printed by the author - 3d printable gun
The physical object 3D printed from the digital files show. Designed and 3D printed by the author

As a physical object, a 3D printed gun has a physical shape. As a gun it can function to harm or kill anyone (though if you read my previous article, 3D guns can hurt the shooter as much as any intended victim). As a gun they are subject to gun control laws.
Current laws are written for digital files, or physical objects, but not both. 3D printed objects are trapped by their own duality.

Birth of an Idea

      In the US making your own gun for personal use is legal (You can’t sell it without a FFL). There are plans available online, military surplus stores, and bookstores for zip guns made out of plumbing parts.

With the advent of affordable 3D printing, the idea of a 3D printed gun was bound to happen.
On July 27th, 2012 Defense Distributed launched the Wiki Weapon Project to produce the first 3D printable gun.

DD’s efforts resulted in the release of the Liberator Pistol on May 5, 2013.

http://https://www.youtube.com/watch?v=drPz6n6UXQY

DD also has produced AR-15 Lower Receivers.

https://www.youtube.com/watch?v=wuDCW_Rn5JI

DD has ignited the debate about high capacity magazines, and provided the files so anyone can make them.

The digital files for the Liberator were hosted briefly on Thingiverse before they removed it for Term of Use violation. DD then hosted the files on their own DEFCAD site, and were downloaded millions of times before the US Government ordered them to be taken down.

Caging an Idea

      The US State Department ordered the Liberator files down, citing ITAR (International Traffic in Arms Regulations). Under ITAR, State Department is treating the digital files for the gun as a physical object. ITAR is designed to prevent military weapons and classified information from going to our enemies.

         It is at this point I’ll state the obvious.

    Defense Distributed and founder Cody Wilson are civilians. The files for Liberator were released Open Source to the public domain. DD does not make physical guns for export under ITAR. The liberator is not classified as military hardware or munitions.
DD is being censored under laws that do not apply to it. DD is fighting the Dept. of State in Defense Distributed v. U.S. Department of State.

Holding onto Sand

       Trying to cage the files for 3D printing is like holding onto sand. The tighter you grip, the more sand falls through.

By this point the genie was out of the bottle. The files for the Liberator can be found hidden in all major file 3D file sharing sites. The dark net also freely host the digital files for the Liberator.

Others have taken up the torch for open source 3D guns. FOSSCAD has released the original Liberator files, along with other 3D printable gun designs developed by others. FOSSCAD members have produced working revolvers as well as their own AR-15 lowers. In the future DD may be able to host the files again.

http://https://www.youtube.com/watch?v=iZ11XFv4iZA

Any civilian can access the digital file for a 3D printable gun; and with a good 3D printer and weeks of time that same civilian can produce a 3D printed gun.

Enforcement of these laws has been non-existent in the US. There is only one know arrest, Yoshitomo Imura of Japan, for making and firing a 3D printed gun.

The Sand Slips from Grasp

Are the digital files for 3D printable gun an object, an idea, or military secrets?

3D guns are objects only when they are 3D printed; but when they are shared digitally, they are a digital idea. It is their fluid duality that will need further legal classification. 3D guns files designed by civilians for a civilian market are not a military secret.

How do we as a society designate the digital files for physical objects?

If ITAR and other laws set the precedent, then the digital files for 3D printed guns are physical objects. However ITAR is NOT the precedent, it’s a legal red hearing. Never before in history has there been a case where an idea so freely turns into a physical object. As a society we must decide on the legal definition of 3D printed files while the technology is still in its infancy.

Should we censor digital files the same way we have censored print media in the past?

Censorship in any form is abhorrent under the best of circumstances. Censoring civilian ideas is even worse. Censoring the digital files for a plastic gun is hypocritical, given that printed blueprints for any gun can be found anywhere, and produced by anyone with a drill press. 3D gun files cannot be censored with the laws written for print media, given the enforcement of paper censorship is non-existent.

Can we even censor anything in the age of the internet?

NO. Censoring the Liberator files has shown how impossible it is to censor digital media now. If you generate controversy over a file like a 3D printed gun, it goes viral and impossible to contain.

NO. The internet is an amazing ocean of ideas. Even if you remove one drop of information from it, the rest of the ocean flows in to take its place.

Legal Disclaimer: This article is written as commentary on 3D printing and gun control laws. Always check your local laws or with a lawyer before constructing your own 3D printed firearm. 3DPT is not responsible for what a reader chooses to do.

Finding the right printer for you.

1
Folger 2020

The Right 3D Printer..

So you heard about 3d printing, maybe you spent years reading news articles about the magic a 3d printer can produce or you’re someone who wants to build things. You have to choose your first printer. These days the waters are pretty deep which is both a blessing and a curse. We have just enough options to make competition, which makes it possible to see better printers being made. This can cause quite the headache for just about anyone that hasn’t spent some time researching what’s available. Well, this will be step one. In this article, we will address the types of printers available and some of the companies that make them. We will also discuss your budget, knowledge, and mechanical skills and see if we can’t find a printer that will fit in just about everyone’s maker space.Dice tower Print

First, we should ask some questions. Let’s start with the obvious.

What can I afford?

Buying a 3d printer is a lot like buying a car sometimes you can afford a new car and sometimes you can’t. So where does your budget set?There are a lot of good printers in a wide range of prices and if you can afford it or don’t mind spending a little more you can get some quality printers but even in the high-end community there are some lemons and there are quite a few really good printers to be had in the sub 500$ market as well so don’t think that money is the only way to get good printers.

The next question you should ask is..

What do I know?

So we have the money but what do we know about these printers. Depending on your answer you may or may not be stuck with just a few commercial printers. At least to start.This is also a good time to think about learning to 3d model if you don’t already but that’s something for another time. Right now let’s focus on what makes them tick. Almost all the 3d printers on the market are the same inside and pretty simple as well. So once you know what makes them tick you can make a better decision on what you should buy. For the sake of time, we will focus on the most abundant choice the FDM 3d printers. All the ultimaker’s, Prusa’s, Kossel’s and the like are FDM it just means they melt plastic and apply it one layer at a time. This means that for the most part, they all operate the same as well. To do that they all use the same basic parts. A driver board, stepper motors, Extruder and build surface. The thing is most use the same exact parts but charge more for a fancier package or better tech support. So when you are shopping check the forums. A printer that costs thousands may have the exact same parts as one that is only 400. we would like to think that because it costs more it must be better but that is often not the case here. Keep that in mind when you open your wallet.

Ok well, how do they work then?

Much the same as your paper printer at home only with one more axis and less intelligence. Yes, I just said these 3D printers are dumber than that Kodak printer sitting in the corner collecting dust. More on that in a minute. So the printer works by taking a file sending it to the 3d printers driver board either directly from your PC or through an SD card. From there the driver board heats up the extruder and the bed ( if it’s heated) and tells the stepper motors where to move and how much filament to extrude. Bear with me I have a point And that point is this. Only spend what you can justify on a 3d printer because it doesn’t matter what you buy they are all going to work just like that. There are some exceptions to the rule but most just don’t offer enough intelligent design to justify their hefty price tags and once you own a printer you can upgrade it yourself. Even those commercial printers are still improving. So unless you want all the bells and whistles or you actually want the security that buying tech support gives you Save some money and look into a kit. The thing is because they are dumb machines they are prone to errors. Your Kodak printer collecting dust has had years of innovation to make it print your pictures without any effort at all. Home 3D printers are still very young and they haven’t worked all the bugs out. Might as well skip the markup if you can and build your own.

How good are my mechanical Skills?

Most kits these days build like a Lego set If you shop around you will find some quality kits under the 500$ that can be assembled in a day or two with basic tools, a little knowledge and can give really great prints. The downside being that you will now have to assemble your own printer and do a little more calibration (Maybe) than if you had just bought one that was shipped in a box ready to print. I personally feel that everyone should start here regardless of where you sit. My reasoning is this by the time you have assembled the printer and successfully printed your first part, toy or test cube you will have a greater understanding and respect for these machines. You will also know just what to look for in the pricier models. Things like enclosed heating areas, heated beds, bed leveling features. All of which can be done on a kit printer as well. I’m not going to get into scratch building a 3d printer because that is a deep rabbit hole that unless you like puzzles, will only put a bad taste in your mouth. That being said you can build a ultimaker clone on less than a third the cost of the real one if you spend enough time planning and shopping for parts.

Now we will put it all together and do some shopping. There isn’t one printer that is better than every other but there are some that make printing a breeze and we will start there.

the right 3d printer
Ultimaker – The right 3d printer?

The right 3d printer?

If you can afford it The Ultimaker 2 is the top of the FDM market. It will print PLA, ABS and even some exotics without batting an eye. The build size is respectable and the community is large so there is little to worry about. They are one of the large companies that are open source. Which has helped build a strong community of maker? As the choice for high-end, this is what I would choose.

Hatch box Filament - the right 3d printer
Hatchbox Filament – the right 3d printer

Maybe you would like something a little bigger.

A Gmax Printer

is a great option in that same price range it’s great at big format prints. The downside is the open build area can lead to warping issues on abs if not looked after. This is more for prototyping large parts though so unless you plan to print large all the time I would give it a pass. I have seen detailed small prints done on them but they can be a little finicky on the smaller side. Overall a good printer but more for a serious maker. I would call this a second printer not a first.

Let’s get to the meat and potatoes of the ready to print the world. The everyday workhorse’s that fit under or at the Thousand dollar range.

Wanhao

has really stepped in with a quality set of machines ready from the box that don’t break the bank. They offer a printer in just about every dollar range and all of them give great prints. Overall if you plan to do lots of printing these machines have you covered. They print in just about every filament on the market and have a growing community. Plus for the cost of 1 ultimaker, you can get 3 wanhao Duplicator 4s or close to 6 I3’s. No matter how you look at it that’s a great deal.

Now let’s talk saving money and buying a kit.

All of those printers operate the same and use the same major parts. What you are paying for is the R&D they put into an out of the box print ready machine and that’s nothing to be ashamed of they are an all great printer that will give good out of the box results. But let’s face facts if you could buy a supercar for fifty thousand instead of two hundred thousand you would jump on the chance or at the very least ask why it’s so cheap. When they tell you it’s because they ship you the car in a box with instructions on how to build it yourself, well that’s when you have to decide. Am I skilled enough to build it or not? Now cars are much more complicated machines and unless you are a skilled mechanic it’s not a task for a beginner. The same isn’t true for 3d printers these days. It used to be you had to be able to code, solder, and assemble these machines but these days kits are to the point where you can buy one screw them together, level the bed and print right away. One such company making this happen is Folgertech. Not only do they offer a wide verity of machines, however, they are all extremely simple to assemble and very affordable.

Chinese Sources for 3D Printers

I started with a kit because like a lot of us I just couldn’t afford the more expensive model, however, as from a Chinese source that had no support and little help in how to assemble the printer. In the end it worked out fine for me but that’s because I’m stubborn. Like a dog with a bone I wouldn’t let go tell it was finished and I eventually got it to print some pretty good prints. If I had it to do over again I would still buy a kit But it would be a Folgertech. They won’t print straight out of the box but you can be printing in the same afternoon with a couple of the models. That frame is very solid and easily assembled and you will notice it looks a lot like the gmax from earlier. That is because they are exactly the same. The Gmax is just scaled up. There are lots of kits on the market and it’s a good idea to look around but if there is a standard for kits Folgertech is it. Low cost, Solid design,easy assembly and a solid community.

The 3d printing waters are deep and getting deeper every day.

We didn’t look at SLS or SLA printers because the only options are high-end or DIY and because the every day maker isn’t going to need one as a starter printer. You have so many more options and if you want you can compare them to this list. I made this list to give beginners a jumping off point and an idea of the costs and abilities of the printers they would buy. With 3D printers it’s more about how much work you want to put in. If the answer is little to none buy a ultimaker it will do just about all the work for you. Sure you will get a hiccup from time to time but odds are it is the filament and not the machine in that case. But if you are willing to put in effort or are just cheap like me a kit is really the way to go. Once you get it printing you can start upgrading. Maybe add that self leveling feature or an extra extruder. Most important is to do the research don’t just buy what everyone says to buy because in the end it’s what fits your needs that matters.