

Watching 3D printers print is interesting however they are slow, it is much better if you can see those 1,2,3,4 hour prints in 30 seconds to see how a 3D printer works. In this article I will be explaining each step from camera mount to rendering the video. You can use just about any camera for this tutorial : DSLR, compact, Action Camera (eg GoPro). There are two methods to make a timelapse : You can take a long video then speed it up for a timelapse, this is an easier option however it takes up lots of storage space on your camera, computer and will take longer to render. However a more professional method is to take pictures at set intervals then use those pictures to make a video, this is a bit harder but it takes up a lot less storage space and can produce better result. I will be using my DSLR for this tutorial, although you can use just about any camera.
Setting up you Camera mount
Either way you are doing a timelapse you will need a tripod or something stable to place your camera on. We do not want the camera to move during the timelapse as this would produce a bad result. You will need to aim your camera at the object you are printing and make sure there is enough space for the object’s length, height and width. If your bed moves you need to encounter that to position the camera correctly.
Video method
If you are using the video method all you have to do is to start filming the print once its starts and that’s it for now, make sure you have enough storage space to hold this video footage and you have framed the camera correctly.
Photo method
So if you have chosen this method which I recommend, it is a bit more complex to set up.
First of all you will need to calculate how many photos you want. This is some simple maths and estimating how many photos you would want, I would recommend if you don’t want to play around with it is to take about 700- 1200 for a print. I use this for 2 hour prints usually. So we will need to set the interval timer on our camera: On a GoPro the timer is built in and on a compact camera it may or may not be built in, it all depends on your camera. On the other hand for a DSLR you will most likely need an intervalometer, these are little controllers that will plug into your camera and control the shutter. I found mine for about £15, so look around for a compatible one for your camera. Now let’s do the maths:
You will need an estimated print time, you can get this from Cura, Simplfy 3D or other slicers. If your slicer does not give a time estimate you can download Cura (it’s free) just to get a time estimate.
Print time = 2 Hours
Now work out the seconds:
2*60 = 120
120*60 = 7200 Seconds
Now we can try different intervals:
2 Second interval: 7200/2
=3600
4 second interval: 7200/4
=1800
6 second interval: 7200/6
=1200
8 second interval: 7200/8
=900
Okay so I will go with a 8 second interval
So we have our interval; the amount of photos will almost never be exact as the time estimation is always off by a bit. Now if you have an action camera (eg GoPro) set your interval and your ready to go. If you are on a compact camera set your interval (if the camera has an inbuilt timer, if not look at the manual if there is any accessory to help) and if you can set it to sport mode or similar. This will help taking pictures of the print head and the moving bed if you have one. With a DSLR, on your intervalometer set the exposure to 0 or OFF; we will let the camera handle the exposure. You can play around with: shutter speed, aperture etc. but I like leaving it on sport mode and possibly on macro.
Okay so now let your print run and turn on the camera!
Editing
Okay so you have your footage, either a long video or a set of pictures. I will be using a free video editor called Lightworks, but you can do this with pretty much anything including Movie Maker.
Video method
Okay so import your video into the software and create a new timeline.

Then drag the video into the start. After that click advanced and increase the speed to something like 500-600%. This depends on how long you want your timelapse, we can calculate this by dividing the total seconds by the the first digit (if your percentage is a whole hundred between 100- 900):

1200 seconds
1200/5
=240 Seconds (timelapse length)
240/60
= 4 Minutes (timelapse length)

Okay so now you want to delete your audio ( if you want) then add music. After that select the clip with markers then export it, and make sure to tick the “use marked” section. Let it export and you’re done!
Photo method
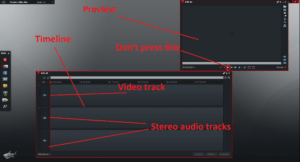
Set your project to 25 FPS, next you want to import your photos, Lightworks will make them into one video file. Do not press play on the preview or in the timeline, doing so will make the program freeze and lag your computer. Only high end PC’s with SSD’s could possibly do that.
Then drag the file to your timeline and I recommend decreasing the video playback speed to about 75% for a longer timelapse. You will need to extend the video clip by dragging the end of the video clip until the video stops, this is because the video will be longer now. Then add music and select the video and audio with markers and export. Make sure to tick the “use marked” section, and you’re done!
Now you should have a timelapse of your print. Feel free to ask any questions in the comments section and I will do my best to answer them. Here is my timelapse I made of printing a low poly Darth Vader (http://www.thingiverse.com/thing:1169476) , although Darth decided to face the wrong way but you get the idea:
https://youtu.be/Y1VmEGVIk8g
Wow nice 3D Print time lapse tutorial! 🙂 Thank you! Much appreciated!
Interesting topic , maybe you can do a video of you printing a stand for a camera , ooh and Lightworks – best get a copy of that , always worthing stuff like that.
T